Entering Incentive Plans
Introduction
The process of entering your Incentive Plans is straightforward. If you've worked with CTDI's paper-based Incentive system, you should find the process quite intuitive. The big changes include:
- New Group Goals which allow management to 'steer' your incentives to focus our efforts at increasing profitability!
- No paper!
Step 1: Create and Submit Your Plan
What follows is a description of the process of entering your Incentive Plans and submitting your plan for approval.
-
When you first login to IGOR, you will be taken to My Incentives. On your first login, you will not see any Incentive Plans yet, only the option
to create a plan for a new month.

Once you have used the system for several months, you will see that this screen lists all the plans you have created, so you can easily review and manage your incentives. In the screen shot below, you can see John's first Incentive Plan has been 'Submitted for Review'. But we're getting ahead of ourselves...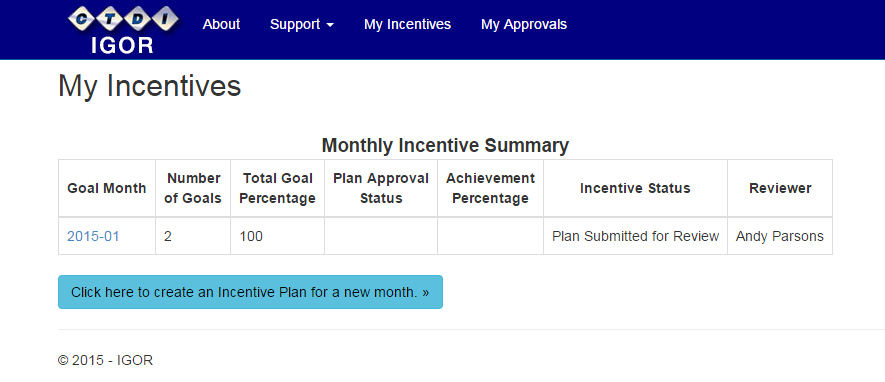
-
To create your first plan, click on the big, pale blue button labeled 'Click here to create an Incentive Plan for a new month'. When you do that, the
system will display a dialog asking you to select the month for which you wish to create a new Incentive Plan. Choose your month and click OK.
-
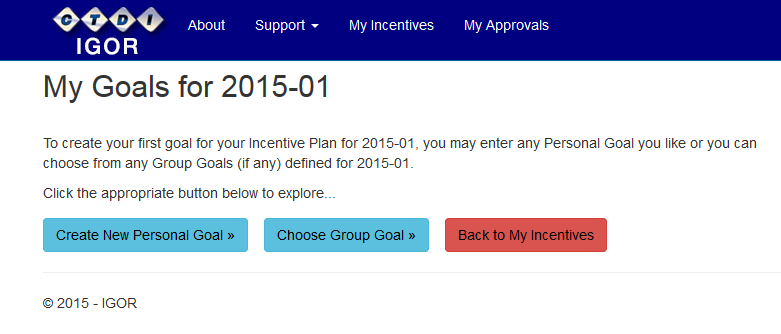
At this point, you have the option of creating a Personal Goal or choosing a Group Goal. Your manager may give you guidance whether or not
a Group Goal makes sense for you. You can choose either type and change your mind later - until you submit your Incentive Plan for
approval, your individual goals can be changed, edited or deleted. Note that an Incentive Plan always
contains at least one Incentive Goal and no more than five goals.
-
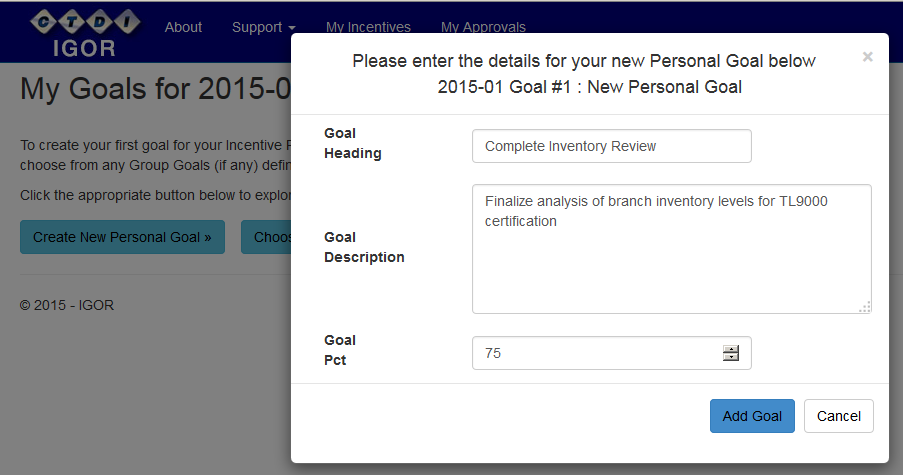
For our first goal, we will create a Personal Goal. When you click the 'Create Personal Goal' button, you will be presented with a simple dialog
that will enable you to enter a Goal Heading, a Goal Description and a Goal Percent. Note that the Goal Percentages for an Incentive Plan must add
up to 100% for a plan to be valid. You can have a single goal of 100% or multiple goals that total 100%.
After clicking 'Add Goal', you will see your created goal, along with the messages relating to the status of your Incentive Plan. In the screen shot below, we see the message Your new goal has been created. Additionally, the bottom of the screen includes other messages, including the requirement that all goals must total 100%.
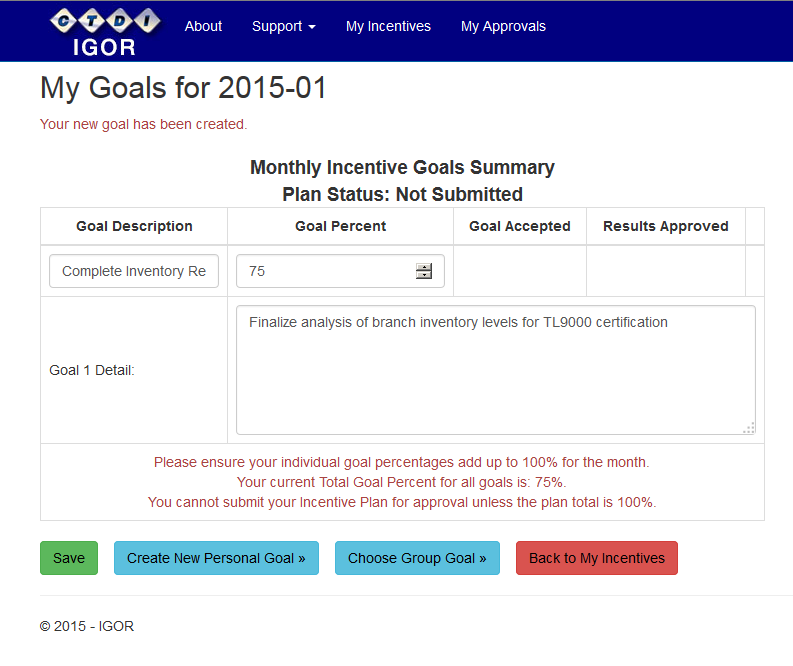
-
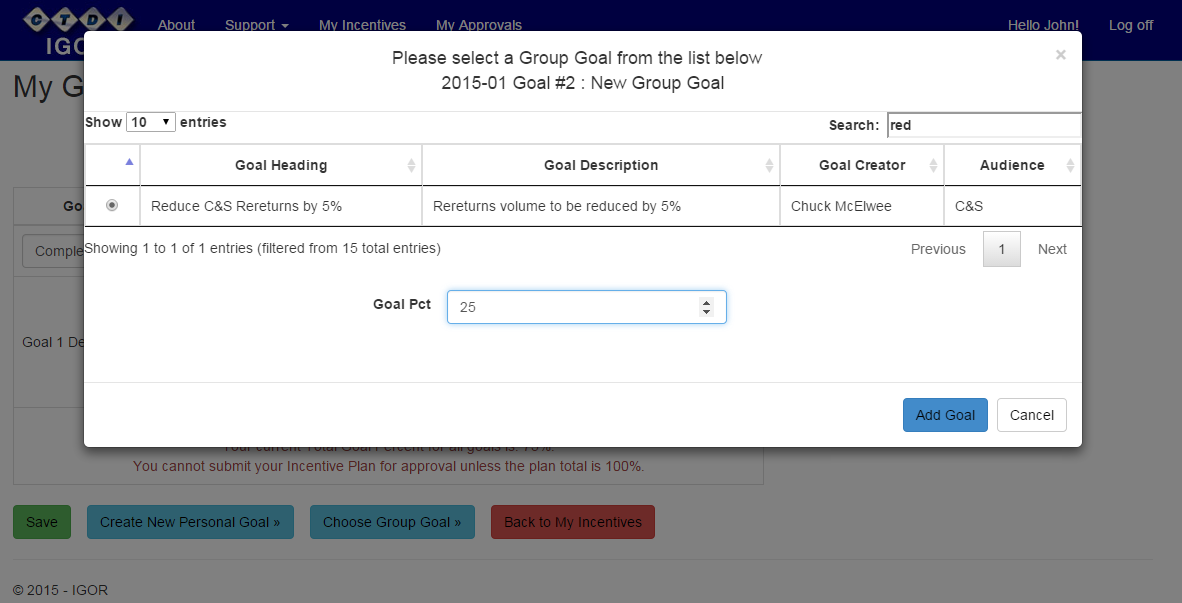
We will choose a Group Goal for our second goal. To do so, we simply click the 'Choose Group Goal' button. If any Group Goals have been defined for
the month, they will appear in a grid which is sortable (by clicking on the arrows to the right of each column heading), searchable (just type in the Search box)
and pageable (using the page numbers and Next Prev buttons). Just choose the Group Goal that matches your situation and click 'Add Goal'.
-
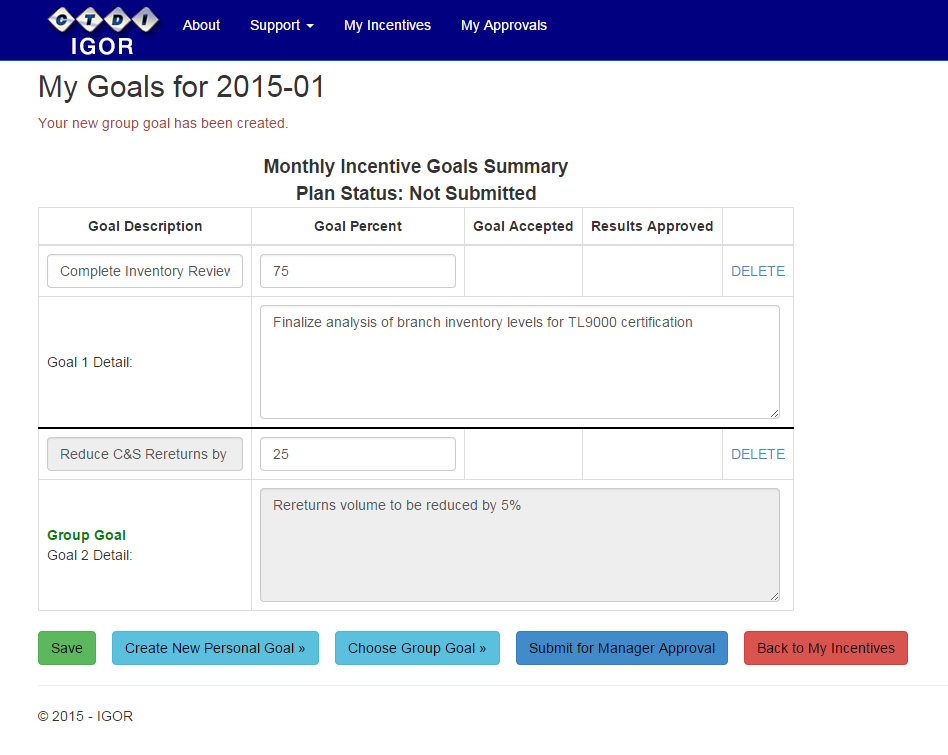
Your Incentive Plan now includes one Personal Goal and one Group Goal. Note that Group Goals are not editable - you choose whether or not to select a Group Goal
and the percentage you wish to assign to the Group Goal. Note that a new, dark blue, button, 'Submit for Manager Approval' now appears on the page.
This is an indication that the plan passes all validation requirements. If you are satisfied with your plan, you can submit it at any time.
You can also come back to the plan on another day to submit it. Also, you can edit all entered goals simultaneously on this screen, changing percentages and descriptions;
just remember to hit Save when you're done!
- After clicking 'Submit for Manager Approval', an email is sent to your manager notifying him of a new plan submission. Your manager will either approve or reject your plan. Whether the plan is approved or rejected, you should receive an email when your manager reviews your plan. If approved, you are done for now, congratulations! If rejected, your manager will most likely include comments regarding changes you should make to your plan. When you log into IGOR, you will be able to select your plan and review those comments, modify your plan and resubmit it for approval.
Step 2: Enter and Submit Your Results
What follows is a description of the process of submitting your plan results.
-
When the month has ended, it's time to log into IGOR and report your plan results. From the screen that lists 'My Incentives'
click on the month for which you are reporting results.
-
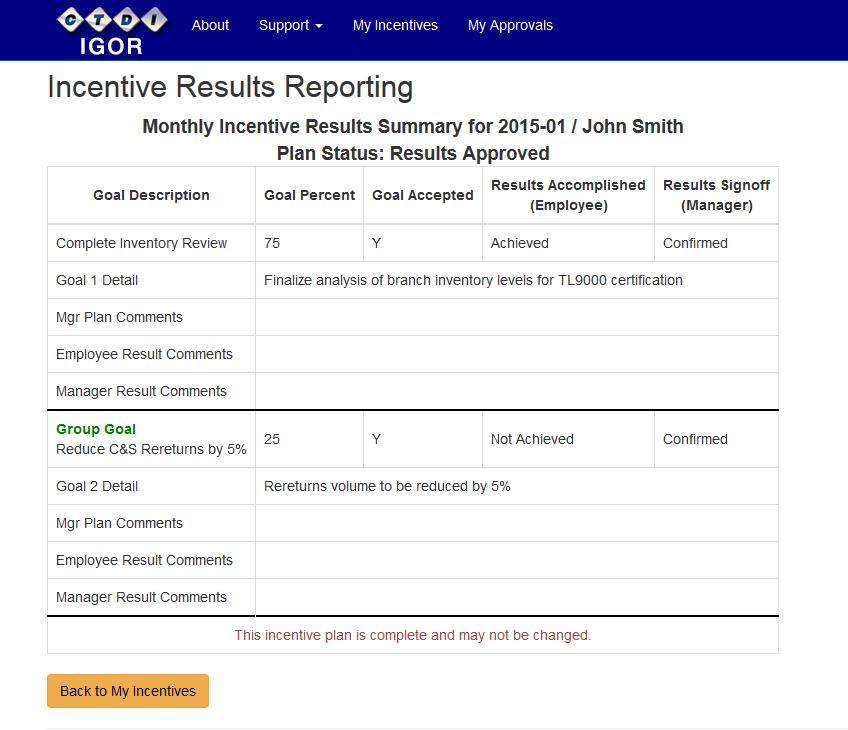
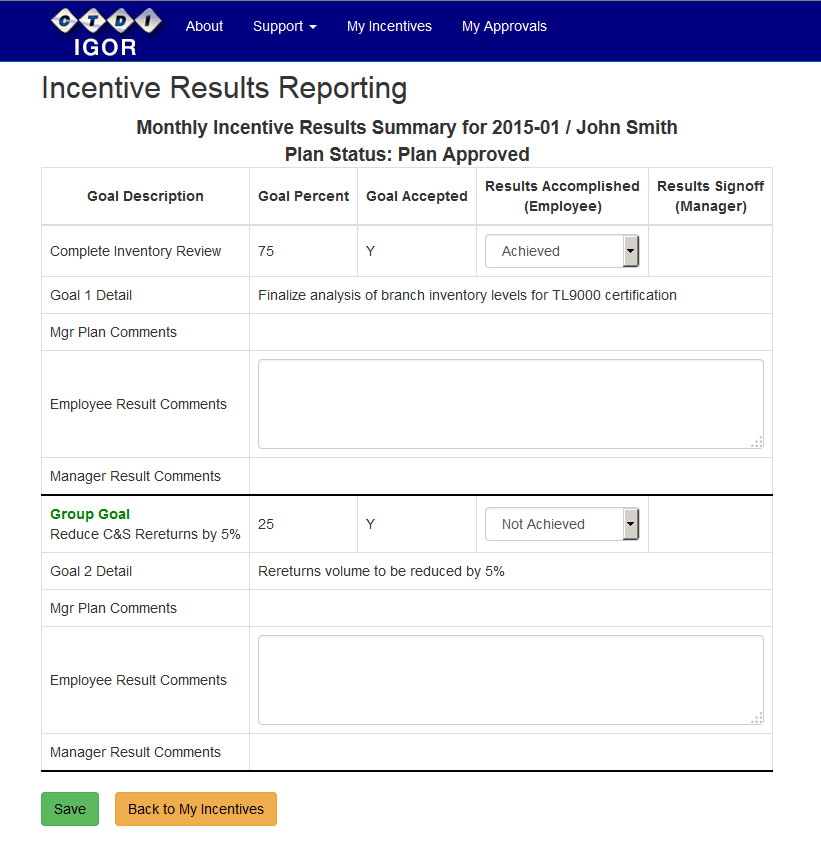
You are now looking at the Incentive Results Reporting screen (below). For each goal you must state whether the goal was achieved or not.
The dropdown below the 'Results Achieved' heading is where this is done. Additionally, you can enter comments regarding why you believe
the results were achieved or not. In the example below, John Smith attests that he Achieved the Inventory Review, but did not succeed
in reducing C&S Rereturns by 5%. After clicking 'Save' on this screen, your manager is notified that there are Results to approve.
-
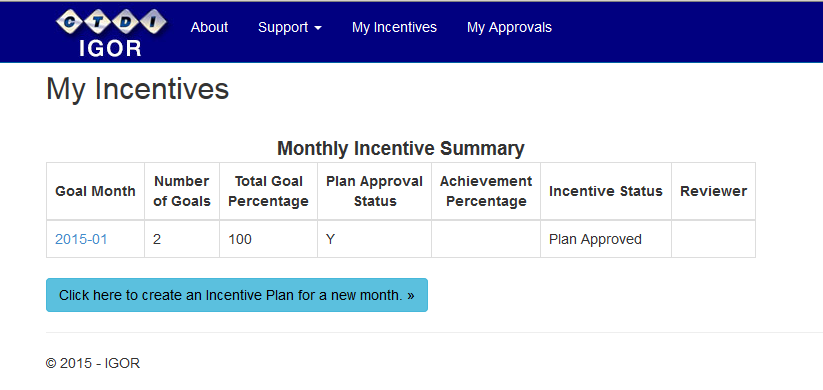
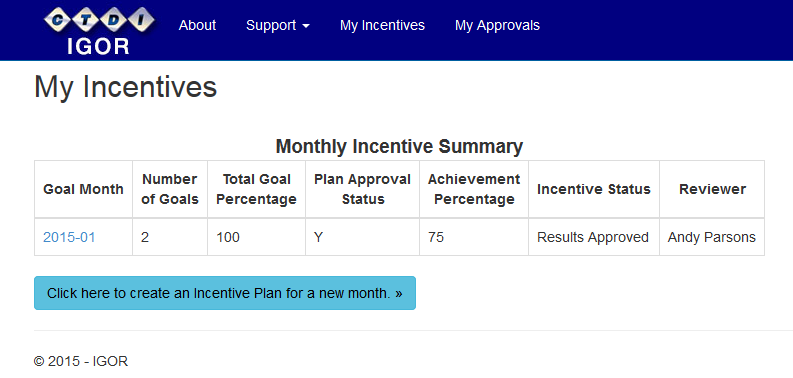
Once your Manager has reviewed your results and approved your input, the cycle for the month is complete. If you log into IGOR, the My Incentive
screen now appears as below. Note that the Achievement Percentage is 75%, reflecting fact that the second goal was not achieved.
-
You can alway 'see' your plans. However, there are times when you cannot change your plan, such as when the plan is complete. You are also unable to
modify your Incentive Plan after the plan or the results have been submitted for review; that is, when the Incentive is in your manager's queue. The
screen shot below shows this condition with the message This incentive plan is complete and may not be changed.
